
Perfmatters(PM for short) is a must-have plugin for WordPress performance, speed optimization, using it you can disable useless CSS, JS, generate key CSS, delay loading JS and images, preload key resources, etc., very powerful and useful.100% focuses on improving theGoogle Core Web VitalsScore.
If you want to get more than 95 points in Google speed test in the tool for mobile and computer, it is highly recommended to use Perfmatters to optimize the effect more thanWp RocketLuckily. pm is a paid plugin without the free version, click on theDownload Perfmatters plugin, permanently updated, source code comparison and antivirus verified very installed.
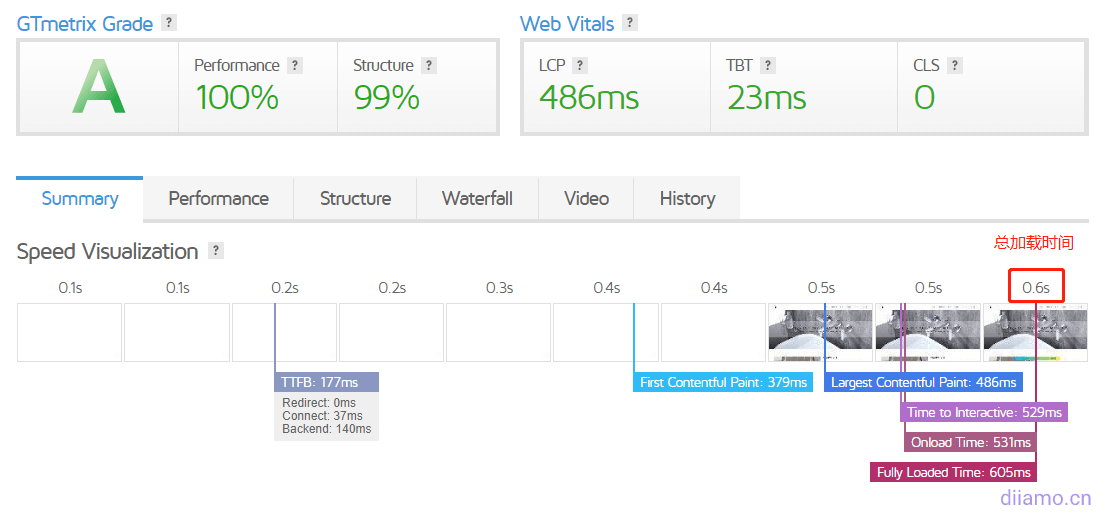
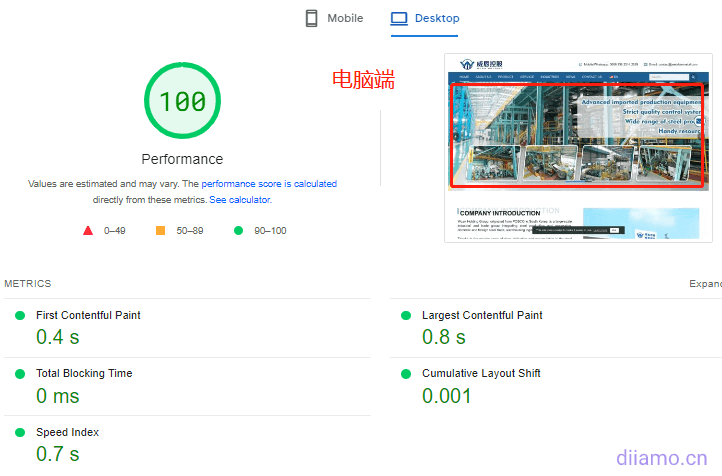
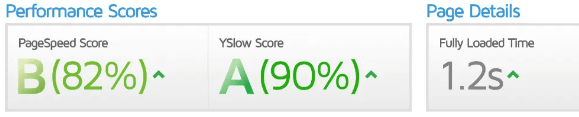
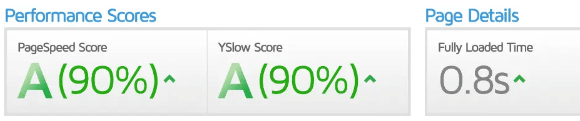
Below is a list of our website builders' websites inGtmetrix.comrespond in singingGoogle speed testAs a result, byAstra Pro+Elementor ProBuild, optimized with Perfmatters. It's very fast and there's still room for optimization, seeing as the results are good we're just too lazy to optimize further.

Although plug-ins are very powerful, if Perfmatters is not set up properly, the effect is greatly reduced when used improperly. Just like painting, in addition to tools, techniques and experience are also very important. Here are some suggestions for settings and optimization ideas, if you have any questions, please leave a comment.
Note: Perfmatters plugin is only optimized for asset and image loading, there are still a lot of optimization work to be done to fully and further improve the speed of your website, please check out theThe Ultimate WordPress Speed Optimization Tutorial.The
Perfmatters Setup Tutorial
Perfmatters settings are important to set up according to your website to be effective. The following tutorials make us handwrite the dry run, so I hope you find them helpful. If you like to watch the video, you can watch thisYoutube Video(requires going over the wall), the plugin author himself explains the setup.
Note: The same feature can only be enabled in one place (plugin), enabling it in more than one place will cause conflict. If you use Perfmatters feature, disable the same feature in other plugins.
General Settings
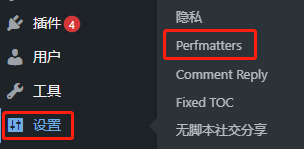
Click "Settings" > "Perfmatters" to enter Perfmatters general settings interface.
Set the settings as shown below, this is to disable some unnecessary features and code. There is a question mark in a circle next to each setting![]() Click on it for a detailed explanation.Button blue for disabled, button gray for not disabled. Below only explains the more important setup content, have questions leave a comment, we see all will reply.
Click on it for a detailed explanation.Button blue for disabled, button gray for not disabled. Below only explains the more important setup content, have questions leave a comment, we see all will reply.
Note: It is recommended to disable every 4 items, open the main page to see whether the display is normal or not, if there is any abnormality one by one to cancel the disable troubleshooting.
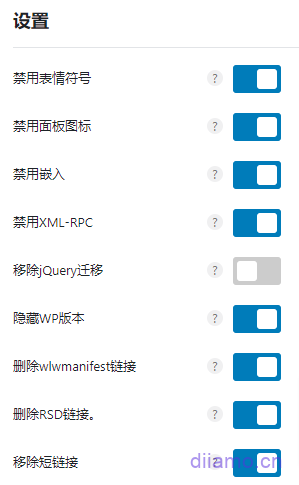
Disable emoticons:Emoticons will loadwp-emoji-release.min.js, if your site does not use emoticons (generally used in inserted article content), it is recommended to disable it (99% sites will not use it).
Disable the panel icon:Wordpress comes with an icon library that will load a Dashicon resource on the front-end, it is not recommended to disable it. The eye icon next to the password on the backend login page, and the status bar icon displayed at the top of the login status on the frontend all need to use it.Variation Swatches for WooCommerce Plugins like this also use it.
It is recommended to set the non-login state to disable the resource in Explorer, so that it is fast and does not affect the normal use of the icon.
Remove jQuery migration:"jQuery Migration" is "jQuery Migrate". The purpose of "jQuery Migrate" is to improve the compatibility between the advanced version and the lower version of the code, only themes/plugins containing old code will use it, now most of the latest version/theme plugins do not use it.
It is recommended to disable it first and check if there are any abnormalities in the page display and functionality. If everything is normal continue to disable it, if there is any abnormality disable it.
Note: Currently (2024.7.02) Astra Pro fixed header function uses "jQuery Migrate", if you have enabled fixed header, you cannot disable "jQuery Migrate". If you add JS code manually to realize the fixed header function, you can disable it.
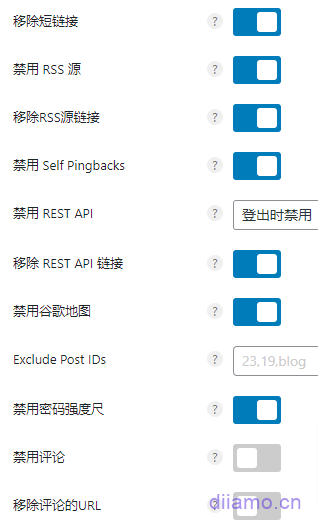
Disable the REST API:Suggest saving defaults (on)TheThe REST API is an interface that will be used by block editors, applets, some pluginsTheIf your website does not use REST API, you can set it to "Disable when logging out". The following chart plug-ins and features using REST API, if you do not understand what it means, it is recommended that you select "Default (on)". If you disable to test the site's functionality, there are exceptions to enable.
![]()
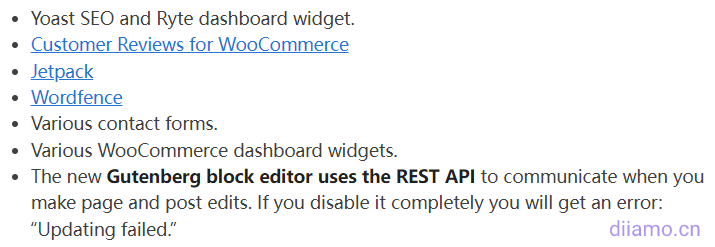
Password Protect WordPress plugin, Contact Form 7, Gutenberg editor, Elementor form, etc. all use REST API and need to select "Default (on)".
Remove comments:Removing the article comment box prevents visitors from commenting. The comment feature can be turned off if the article doesn't need it, removing it is generally not recommended. Article comments help improve customer experience and SEO results. Usually you should try to get visitors to leave comments as often as possible.
Remove the URL of the comment:in the comments box of the article after removing theURL input boxIt will disappear and visitors will not be able to enter the URL. It can avoid spammy outbound links and is recommended to be removed.
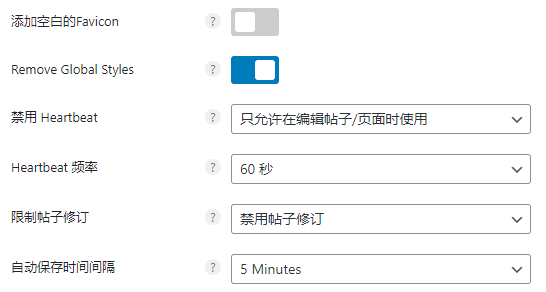
Remove Global Styles:If you don't use the two-color filter feature of the Gutenberg editor, disable this and you can cut over 300 lines of code. I disable it if I don't use the Gutenberg editor.
Disable Heartbeat:It is the same function as Wp Rocket's "Heartbeat Control". Function: 1- When you create/edit an article from the editor, it provides the function of saving the article automatically at regular intervals; 2- If someone is editing a certain content, the list page will prompt the following content "xxx is currently editing".

Suggested selection"Only allowed when editing posts/pages","Heartbeat Frequency"Select 60 seconds. It can greatly reduce CPU utilization and a lot of PHP calls, reducing the burden on the server.
Heartbeat Frequency:Pick up to 60 seconds.
Restrictions on post moderation:Select "Disable post revisions". Post revisions are when old versions of posts/products etc. are automatically saved so that they can be restored later, which slows down the database and takes up a lot of disk space.
In the vast majority of cases we do not revert to older versions of posts, and we recommend disabling this feature to speed up the site. If you need this feature, you can limit the number of post revisions to 1 or 2.
Automatically saves time intervals:It is recommended to set it to 5 minutes. By default WordPress automatically saves drafts of articles and products every 60 seconds. Re-opening/reloading the page in case of disconnection, etc. can restore the content from the auto-saved drafts to avoid content loss.
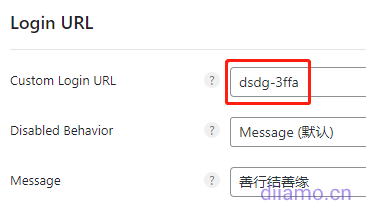
Custom Login URL↑:Modify the background login address, greatly increase the security of the site. WordPress background default login URL unified xxx.com/wp-admin, it is easy to be attacked. Input here can replace the URL suffix "wp-admin".
For example, enterdsdg-3ffa, the backend login address will change to xxx.com/dsdg-3ffa/. Be careful to save the new login address after modification!
Disable Behavior If you choose Message↓, the default login URL will show the content of Message column. You can also choose to display 404 error page, automatically jump to the home page, redirect to other URLs.

If you forget the new login URL in the backend, go to the wp-content folder of FTP, find the folder perfmatters and rename it toperfmatters#. This will disable the perfmatters plugin to disable the new login address, and it will be possible to log in using the old login address xxx.com/wp-admin.
After successfully logging in, change the folder name back to perfmatters from perfmatters#. go to the plugin list page, tap Activate perfmatters to re-enable the plugin, and then view/modify the login URL again.
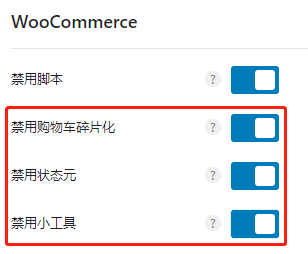
If it is an e-commerce website with shopping function, don't disable all of them! If it is 2B foreign trade website without online shopping function, it is recommended to disable the red box 3 items in the above figure, it is very safe, click on the option next to the circle next to the question mark to view each option to disable which features.
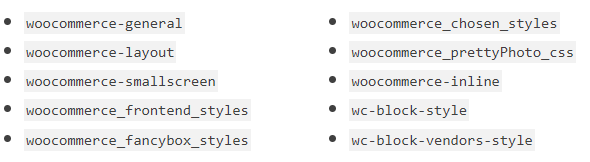
Disable scripts:After disabling, all pages except shopping cart, checkout page, personal account page, product list page, store page, product detail page, product tab page will remove the Woocommerce code shown below, which will greatly improve the page loading speed!
Tip: Do not enable this feature for 2C e-commerce sites. Because each page header usually has a shopping cart and avatar icon, if you enable the "Disable Script" function, it will lead to abnormalities in the shopping cart and avatar functions.
Note: Disabling scripts will also disable these codes on the homepage, making it impossible to insert products via shortcodes or Elementor product widgets on the homepage, so please decide whether to disable them or not according to your needs. However, there is a workaround.
We build our sites with "Disable Scripting" enabled, using Elementor's "frame"Widget insert product/. Just use the product image for the widget, the product title for the caption, and the product link in the link field. Or an easier way is to use the "posts" widget, which pulls in the product.
For example, in the picture below weHome Articles sectionIt's actually using 3 "image frame" widgets.![]() Make and also show the product in the same way (can't show the price).
Make and also show the product in the same way (can't show the price).

There is another way to use Perfmatter'sperfmatters_disable_woocommerce_scriptsFilter hooks (hooks) exclude specific pages from disabling Woocommerce code.
If you don't understand these 2 methods above and need to insert a product on the front page.Do not disableThis feature. Change to manually disable the above code on the article list page, article details page, contact us page, about us page and other pages that don't use Woocommerce manually, it's just a little bit tricky.
Assets Settings
This page of settings is the most important, complicated and troublesome feature. Speed improvement depends mainly on it, look at it carefully and attentively.

Open Enable Script Manager to disable useless CSS/JS.
Detailed JS asynchronous (defer/async) and delayed loading (delay) difference
First understand the difference between JS asynchronous (defer/async) and delayed loading (delay), it helps to better understand the use of Perfmatters asynchronous, delayed JS features.
A page has many kinds of code, generally from top to bottom is CSS > JS > main html (website content). Some CSS and JS will appear inside or below the html, alternating between the three. Browsers load web code and resources (images/fonts, etc.) in top-to-bottom order.
By default, when loading JS code, it will stop loading html code, and wait for JS code to finish loading and executing (function) before continuing to load html. many JS has no effect on the page content display, but only affects the function, while html is the key to affect the content display. So it's a waste of time to wait for JS to finish loading and executing before rendering the html content.
The following figure shows the progress of html and JS loading by default (from left to right), green represents the html loading time, gray represents the JS downloading+executing time (blue is downloading, red is executing). You can see that html loading is interrupted when encountering JS loading and execution.

Defer is also called Async, which means asynchronous loading. Asynchronous loading takes the JSfileThe position is moved to the bottom of the main html (waterfall) so that the html can continue to load (without interruption) while the JS is being downloaded (blue color in the picture below), thus shortening the loading time of the display content.
However, JS will be executed immediately after loading (red below), and html download will be interrupted during JS execution (gray below), until JS execution is finished and then continue to load html ↓, it will still have a little impact on html loading.Tips: Defer will not be loaded in order, which one of the JS is loaded first, it will be executed first.

Delay is delayed loading, while JS is downloading (blue color below), it will continue to load html (without interruption), and wait until all html is loaded before it starts to execute JS (red color below). Compared with asynchronous loading, delayed loading will not interrupt html loading during JS execution, which is faster.

JS is mainly responsible for functionality, only a few JS will affect the page content display. The code tends to be inter-dependent and entangled, and sometimes needs to beprior executionThe associated content/functions will continue to display/execute properly only after certain JS.
Delayed loading JS is executing JS last, which disrupts the dependency relationship between codes, so it may lead to abnormal page display and function. And asynchronous loading JS is a safer JS optimization method because it executes immediately after loading, so it rarely leads to website exceptions.
Delayed loading JS can cause website problems, but it is much better for speed improvement than asynchronous loading JS! It can greatly improve the Google speed test mobile score, and must be used. As long as the exclusion of some key JS is delayed loading can be solved site display and functionality anomalies.
Which JS to exclude needs to be determined by the theme, plugin, and page creation method used, and it is not possible to provide uniform exclusion options here. Which JS should be excluded from delayed loading? This is where the difference between a rookie and an expert comes into play, as does caching plugin compatibility and speed improvements. This is a little bit complicated, please move toTutorial on the use of Perfmatters.".
Diarmo launchesWordPress Website Speed Optimization ServicesIt helps you to delete/disable useless JS and CSS codes on your website, delay non-critical JS loading, compress images, configure CDN acceleration, etc., which greatly improves the speed of your website. Google speed test computer terminal and cell phone terminal score can go to 95-100 points, open the page in seconds.
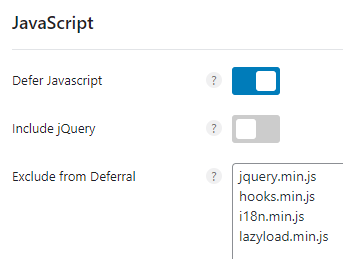
Defer Javascript:Asynchronous JS loading, enabled. This will move the JavaScript to the bottom of the page to load, which helps to solve the "rendering blocking" error prompted by Google's speed test. It can be used in conjunction with the Delayed Load JS below, if both are enabled, the JS will be delayed first, and then loaded asynchronously when it can't be delayed.
Include jQuery:Don't enable it. This is meant to load jQuery asynchronously at the same time, and there is a huge probability that the site will have problems if you enable it.
Exclude from Deferral:Exclude certain content from loading asynchronously. Copy and paste the following 4 lines into the box to exclude asynchronous loading, we found that if we load these 3 WordPress resources asynchronously it will cause the frontend to report an error.Format as shown, one line at a time!The
jquery.min.jshooks.min.jsi18n.min.jsFull Selection Codemake a copy of
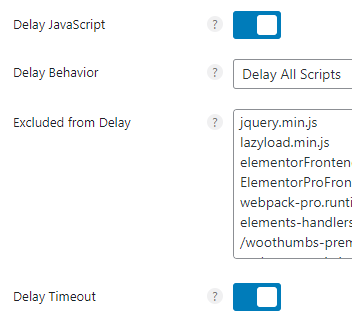
Delay JavaScript:Delayed JS loading, enabled. Will delay the loading and execution of all JavaScript files and inline JS scripts until there is a user interaction (e.g., moving the mouse on the page, touching the screen, scrolling, pressing keys, scrolling with the mouse wheel) as a way to improve performance.
It is similar to the image delayed loading feature, but applies to JS files. This optimization will improve the following suggestions in PageSpeed:
- Delete unused JavaScript;
- Minimize/reduce main thread work;
- Reduce JavaScript execution time;
- Reduce total blocking time;
- Reduced interaction time;
- First contentful paint;
- Other core network vitality factors;
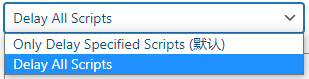
Delay Behavior:It is recommended to choose "Delay All Scripts" for the best speed improvement and the worst compatibility, but the compatibility problem can be solved by excluding the delayed loading of some key JS.
Excluded from Delay:Excluding delayed loading of some JS, the following "Perfmatters Tutorial" will explain in detail.
Delay Timeout:Enable, this can improve compatibility. The above mentioned delayed loading JS will be until the user interaction will not load JS, the actual situation is that JS interdependent, a lot of time to the time to load and not loaded resulting in functionality failure, display anomalies.
When you turn on this feature, it will automatically load all JS after 10 seconds from the start of page entry, without waiting for user interaction. This does not affect the page loading speed, and at the same time improves the loading efficiency of the JS code. If you want to adjust the time value of 10 seconds, copy and paste the following code into thefunctions.phpThe bottom will do.
The official recommendation is to adjust the time to 7 seconds (listen to the official), we tested and found that if the setting time is lower than 6 seconds some functions will not be executed, andGtmetrixThe speed measurement time will become 6-7 seconds, which is inaccurate.
// change Perfmatters Time Out time to 7 seconds add_filter('perfmatters_delay_js_timeout', function($timeout) { return '7';});Full Selection Codemake a copy of

The above two functions need to be enabled in "Tools" > "Plugin Settings" to show "Show Advanced Options". To see what they do and whether they should be enabled, seePlugin SettingsChapter Notes.
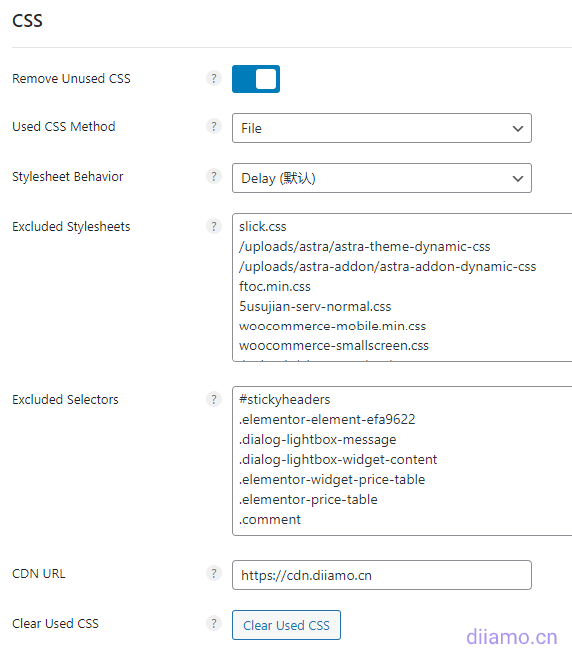
Remove Unused CSS:Open to delete useless CSS/generate key CSS. Because the plugin theme is not written with high quality, everyone has different settings and other reasons, which leads to a lot of useless JS and CSS code on every page. This function can be opened to prioritize the loading of key CSS that affects the display of page content, and delay loading/not load useless CSS.
Most websites use "Remove Unused CSS":
- FCP decreased by an average of 15.201 TP3T.
- LCP declined by an average of 19.66%The
- TTI decreased by an average of 14.951 TP3T.
Used CSS Method:How to load the Used CSS, it is recommended to choose File, which will regenerate the key CSS in a new CSS file, and Inline, which will insert the key CSS directly into the page html as inline CSS.
File is chosen because files can be cached, while inline CSS cannot. For example, the first time a visitor enters a product detail page, the key CSS File will be cached in the visitor's browser. When the visitor opens another product detail page, the key CSS file will be retrieved directly from the browser record and displayed directly on the page, without having to go to the server to download it again. This is faster and reduces server pressure.
Wp Rocket's key CSS is inline, can not choose File, so we chose to use Perfmatter to generate key CSS. different plug-ins to generate key CSS accuracy is not the same, some plug-ins this feature will lead to some of the contents of the page to display errors, the need to exclude the corresponding CSS. interested in their own comparative study.
Stylesheet Behavior:Above "Used CSS Method" is to choose how to load the key CSS, this option is to choose how to deal with the Unused CSS.
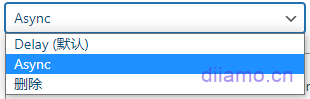
It is recommended to choose "Delay", will delay loading useless CSS until the user interaction, fast, but like delayed loading JS compatibility to be almost. On the contrary, "Async" has better compatibility, but the speed improvement is a bit inferior. It is officially recommended to choose Delay first, and then rule out delayed loading or change to Async when something goes wrong.
Select "Delete" to speed up the biggest, but the worst compatibility, may lead to some content on the page disappeared, need to exclude some CSS. if you do not know CSS do not choose this.
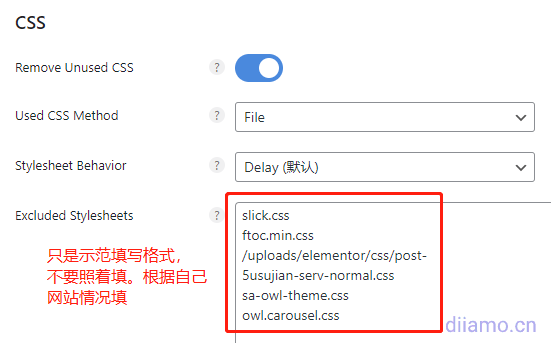
Excluded Stylesheets:If some critical CSS is delayed loading as non-critical CSS causing slow display, pasting the name or path of those CSS here will re-add it to the critical CSS.Format according to the figure below, one line at a time! The following fill in the content of the same, enter the format according to the figure, without further ado.
You can fill in the CSS name or the path.
Excluded Selectors:The same as the above "Excluded Stylesheets" is the same function, except that the above is to include the whole CSS file into the key CSS, and here is to include only the CSS of specific content into the key CSS. this function is very good, you can accurately control the key CSS, and it is more suitable for us than Wp Rocket. Manual party.
For example, when loading the header, the navigation icon jumped a little (display process from big to small), may be the control icon size of the css code is treated as useless css delayed loading. At this time you can control the icon of the css of the .class or #id fill in here.
CDN URL:If you are using a CDN (excluding Cloudflare) and are not using Perfmatters' CDN rewrite feature ↓, but are using a CDN rewrite feature like Wp Rocket Rocket, you need to fill in the CDN acceleration domain name here.
If you are using Perfmatters' CDN rewrite feature or not using Perfmatters' Remove Unwanted CSS feature, leave the CDN URL blank and don't fill it in.
![]()
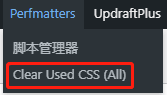
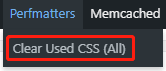
Clear Used CSS:Re-generate key CSS means. If you use Elementor or the like to modify the layout of the page, the appearance of the content, resulting in changes to the CSS, you need to click this button to regenerate the key CSS. or click the top toolbar button to clean up ↓.
Note: If you have used CDN and caching plugins, you need to clear the CDN cache first, then the third-party (caching) plugin cache, and finally the Perfmatters cache, in order to properly clear the cache.

Add custom CSS, JS, HTML code to header/header (header), theme (body), footer (footer). For example, you can add Google tracking code, preloading code, etc.
Elementor Pro's Custom Code function is the same as this one, but it's more powerful and you can choose which pages the added code will take effect on, so we recommend using it.
Astra Pro theme's Custom Layout feature is even more awesome, not only can you choose which pages the added code will take effect on, but you can also choose to insert the code/content into the page's specific hook (hook) location, recommended.
Preloading Settings
This is the preloading, pre-linking, DNS prefetching settings. It is also a very important feature to control the priority loading order of resources to improve loading efficiency and speed.
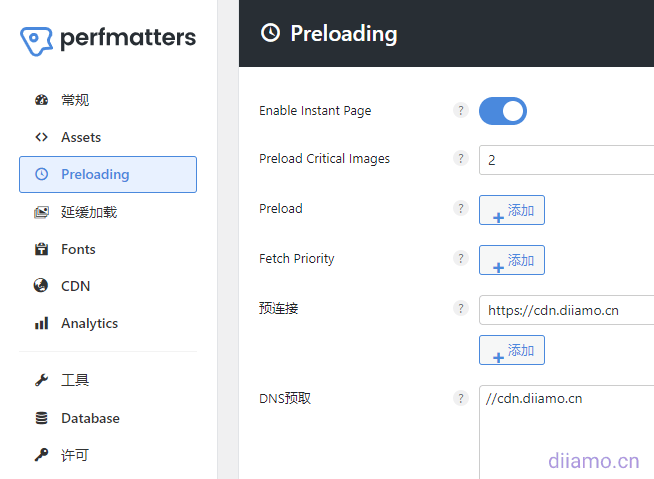
Enable Instant Page:With Wp Rocket's "link prefetch" is the same function, mouse over any link in the page will start loading the link page in advance, when the visitor clicks on the link to display the link page will be much faster (because of pre-loading).
This feature can improve the speed of visitors to open the page links, but it will also increase the burden of the site. If your server configuration is high and bandwidth is sufficient, it is recommended to turn it on. Otherwise, keep it closed.
Preload Critical Images:Preload key images. It will prioritize the loading of images on the page in top-to-bottom order (will not preload SVG images and icon icons) to speed up the display of images, it is generally recommended to select 2 or 3, selecting too much instead may reduce the page speed.
Note: The images inside the navigation bar dropdown menu are also preloaded and counted inside the preloaded quantity.

Preload: Preload, after setting, you can preload (prioritize) critical resources to speed up the page display. With the following Preload Critical Images function is the same, the difference is that the preload in addition to supporting images, but also supports CSS, JS and so on.
With Preload, you can adjust the loading order of resources (especially header and first screen content), prioritize the loading of resources that affect rendering, and speed up page rendering. Generally do not preload more than 4 contents, or it may cause blockage and become stuck.
If Google speed test suggests that there are resources blocking the rendering, try setting those resources to preload and re-testing the speed to see if the blocking can sometimes be solved.
If you enable the "Remove Unused CSS" feature mentioned above, you can't preload CSS inside the preload, or there will be a conflict.
Fetch Priority:This is an HTML attribute introduced by Google to set the priority (high or low) of a resource. It has the same effect as the Preload feature mentioned above, but is not as aggressive.
Currently the mainGoogle (Chrome) and Edge browsers support fetchpriority propertyThe other browsers don't support it as well. It is officially recommended to use both Preload and Fetch Priority in most cases.See the difference and usage of the 2The

Pre-connection: Allows browsers to set up early connections before HTTP requests, eliminating round-trip delays and saving time for visitors. Generally used to pre-link Google fonts, if you have used Google fonts, enter the font URL here.
DNS prefetch: Tip browser in the background during idle time to pre-complete the DNS resolution of off-site resources (such as Youtube videos, CDN URLs), point you click on the off-site resources when loading speed will be faster. Generally used to preload the URL of external resources.
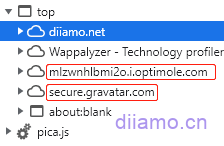
Google Chrome press F12 to go to Developer Tools and click on the ![]() You can see what external resources are available on the current page. Just enter the external resource URL prefix into the prefetch box.
You can see what external resources are available on the current page. Just enter the external resource URL prefix into the prefetch box.
Delayed loading settings
This is the delayed image loading feature. Delayed image loading means that only the first screen and images within a certain distance from the first screen are loaded at first. Images outside the range are not loaded at first, and the remaining photos are gradually displayed according to the distance until the visitor scrolls down the page, thus greatly reducing the loading content and loading time.
Use delayed loading before ↓
After using delayed loading↓
So many people say that delayed loading of images is necessary to improve speed and must be done, which is true that it does help to improve speed. However, some top speed bulls also say that delayed image loading is not good for customer experience and is not recommended to be enabled. Everyone is right, just from a different perspective and position.
Let's start with the disadvantages of delayed loading images. Delayed loading is generally the use of the browser's native delayed loading or the use of JS delayed loading, the theory should be in the picture is about to enter the visual area on the early preload, and so visitors slide to the picture position, the picture has been loaded in advance to display. But many times the actual situation is not so.
You should usually browse the web should have encountered images appear very late, appearing may be a moment to pop out or from blurred to clear. Visitors need to spend time and mood to wait, so some people say that delayed loading images is bad for user experience.
According to our multiple site optimization experience, excluding the first screen image is delayed loading, delayed loading of the first screen outside the picture is best, taking into account the user browsing experience, but also to improve the page loading speed.
WordPress 5.5 starts with native delayed loading functionality, using the browser's delayed loading. However, we recommend using the delayed loading solution in Perfmatters. Why? Our solution is faster and better than native delayed loading for the following reasons:
- Native delay means that it lets the browser decide what should be delayed to load, and unfortunately by default itToo eager., there are usually not too many resources that are delayed in loading, which means it's not too fast;
- Images must be uploaded to the WordPress media library with width and height added, which means that native delayed loading may not work for all images;
- Native delayed loading does not support CSS-added background images;
- Native delayed loading is improving, but still lacks support for certain things and has limited functionality;
Important Tip:When you enable delayed loading in Perfmatters, the default native delayed loading in WordPress will be automatically disabled.
After talking about the optimization ideas, we now start setting up the optimized image delay loading.
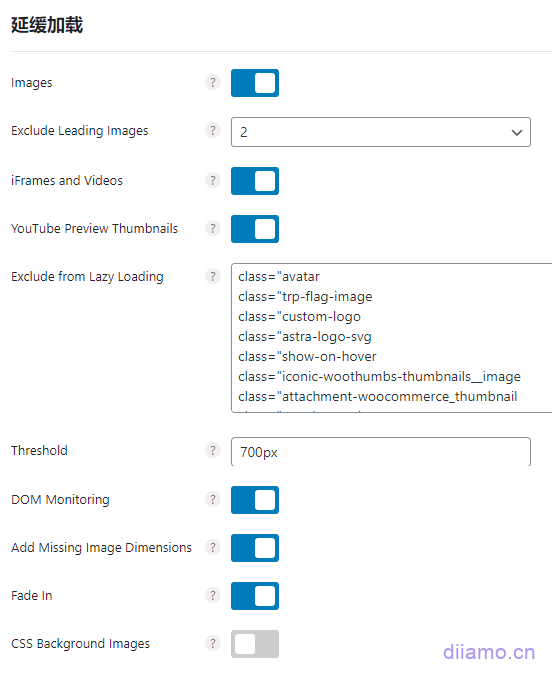
Images:Turn it on to enable delayed loading of images.
Exclude Leading Images:Exclusion Delay Delay the number of images loaded against the front, select 4 or 5.
iFrames and Videos:Delay loading iFrames and Videos, open. As we all know videos are large and affect the page loading speed. Enabling this feature will replace YouTube iframes with preview thumbnails of Youtube videos and lightweight SVG playback icons automatically.
At the beginning only the video cover image and play icon are loaded, not the Youtube video. The video starts loading only when the visitor clicks play, so that the video has the least impact on the speed of the page, which is also the fastest way to load YouTube videos.
YouTube Preview Thumbnails:It must be turned on, which is mentioned above using the preview thumbnail of the video as the video cover.
Exclude from Lazy Loading:Exclude delayed loading. Add the name or .class of the image that you don't want to be delayed loading. All images on the first screen of a web page should not be delayed loading, such as logos, flag photos in front of multilanguage, user avatars, first banner images, etc.
The previous settings do not delay the loading of the first 4-5 pictures, generally speaking, the first screen should be excluded from delayed loading if there are not many pictures. However, there are exceptions, the following Perfmatters tutorial will teach you in detail how to check whether the image is delayed loading and how to exclude.
Pay attention to the image name and .class format, one line at a time! Just use a format like xxx.jpg for the image name, and always use the .class attachment-woocommerce_thumbnail into the exclusion box, noting that it is not followed by " Symbol!

If you have a pop-up window (for example, the picture below), and there are pictures inside the pop-up window, the picture of the pop-up window may be displayed slower after enabling delayed loading, and you need to exclude the corresponding picture from being delayed loading. If the display is still slow after exclusion, you can try preloading.

Threshold:The plugin author suggests to set the distance from the visual area to start loading photos to600px. The above analysis idea says to delay the back picture loading, and start loading the display picture when the picture is about to enter the visual area. Here is to set the distance from the visual area less than how much distance to start loading pictures.
Plugins like Wp Rocket don't have this setting option for delayed image loading, so we felt that the Perfmatters feature was more in line with our optimization ideas.
DOM Monitoring:DOM Monitor monitors changes to the DOM and dynamically delays the loading of newly added elements. This improves compatibility and ensures that infinite scroll elements work properly.
The most common example of infinite scrolling elements is the infinite loop of the autoplay slideshow (banner and so on), if your site does not have autoplay + infinite loop of scrolling slideshow and such elements.orDo not turn on this feature if the images of these elements exclude delayed loading, and vice versa you can turn it on.
If you have a pop-up window, and there are photos in the pop-up window, the image of the pop-up window may be displayed slower after enabling delayed loading, enabling "DOM Monitoring" will help to speed up the display of the image.
Add Missing Image Dimensions:It is recommended to enable it. It will add width and height attributes to the image to optimize the page display.

If an image is missing the width and height attribute properties, it may cause the layout to be offset, triggering the CLS warning in Core Web Vitals: Image elements do not have explicit width and height.
Fade In:Recommended to enable. When the page is about to slide down to the delayed image loading area, the image will be displayed as a fade-in effect (smoother transition) instead of popping up immediately, which is a better visitor experience.
The Fade In feature may not work with some imagesRotation functionThe image of the wocommerce mouse-overToggle display imageFunction, as well as Elementor Call to Action widget (mouse slide over the background image animation failure) and so on there is a conflict, if the site has this type of picture display problems try to turn off the Fade In function or exclude the corresponding picture (page) of the delayed loading.
CSS Background Images:Background images are loaded via CSS, so they can't be delayed under normal circumstances. When you turn on this feature, an input box will appear, just enter the .class name of the CSS that loads the background image and you can delay loading the corresponding background image. Note the formatting, there is no. One line at a time.
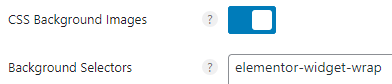
If the background image of the page is within the first screen area (e.g. poster/banner, top header background image) or if there is no background image, then don't turn this on. Conversely if there is one, turn it on.
Fonts Settings
If you're not using Google Fonts, just disable them and suggest using system fonts or locally hosted fonts.

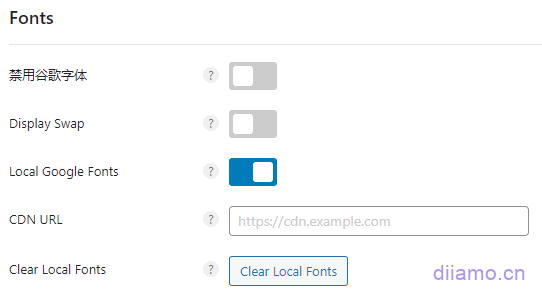
Local Google Fonts:If the website has Google fonts it is recommended to select Disable and then manually switch to use the system fonts. If you think Google fonts look better or you don't know how to switch to use system fonts, then turn on this feature.
Note: This feature can only be enabled in one place! If the theme, other plugins have the same function choose a place to enable it.
When you open it, it will automatically download the Google fonts locally, and then locally host the Google fonts. If you have use AWS, Tencent Cloud CDN or such CDN that will change the resource URL, enter the CDN domain name into the CDN URL box in the image above, paying attention to the format:https://cdn.xxx.com Finally, remember to click on "Clear Local Fonts" to refresh the fonts. Finally, remember to click "Clear Local Fonts" to refresh the fonts.
CDN Settings
When you open it, it will rewrite the website's image, JS, CSS URL prefixes to CDN URLs. If you are using Cloudflare, don't turn on this function, because the CDN URL of CF is the same as the website URL. If you use Optimole or other pluginsincommunicadoChange the image URL to a CDN URL and don't open this either.
Generally use Tencent Cloud or Amazon AWS and other CDN, CDN URL and the original site URL is not the same, so you need to enable this feature to the site's images, JS, CSS URL rewritten into the CDN URL in order to put the use of the CDN function.
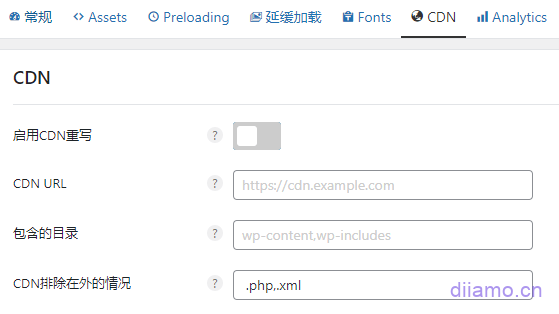
Note: It is not possible to set the value of an object added via external CSS (not inline) to thebackground imageURLs are rewritten to CDN URLs because of Perfmatters. if it is a background image inside the Elementor builder, you can use the Elementor > "Tools" > "Replace URL" function to replace the background image URLs to CDN URL manually.
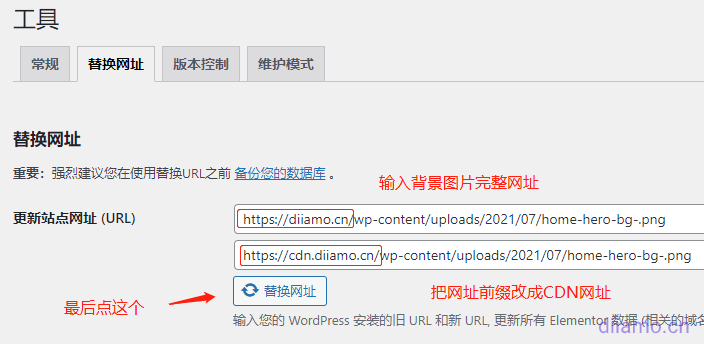
Successful replacement of URL ↓

Cleared all caches (browser, site backend, CDN), went to the frontend and refreshed the page to find that the images had been loaded from the CDN.

Update: The above method has a drawback, after using elementor to edit the corresponding page, the image URL will revert to the old URL. It is recommended to use handwritten CSS to add the background image to the corresponding section instead of using elementor to add it.
Analytics Settings
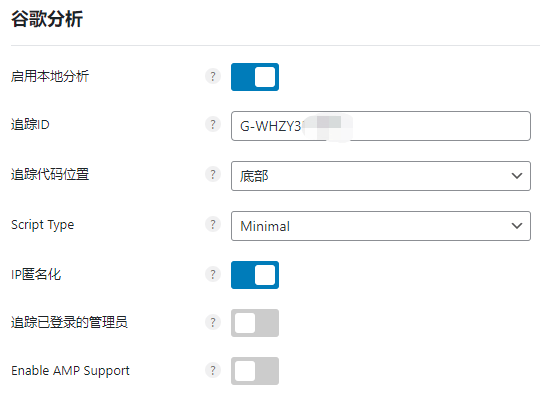
This function is to add Google Analytics code, which is very useful and convenient. If you need to install Google Analytics code by this function, it is recommended to set it according to the picture.
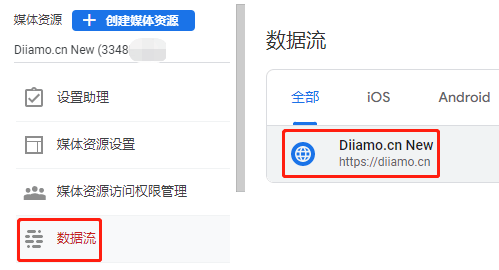
Tracking ID:Enter the ID of the website you created in Google Analytics. After Google Analytics creates the data volume it will show the following picture, the red box that is the measurement ID, copy and paste it into the input box on the line.
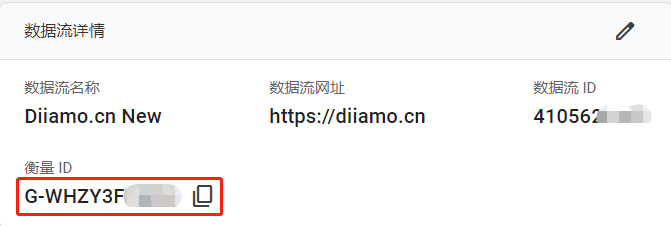
Or click "data volume">Click on the website again to go to the screen above.
Tracking code location:Google Analytics officially requires the selection of "head", in order to avoid don't interrupt loading and so on affect the data. If your site is not slow, in fact, the location to choose "bottoms"It's also totally fine, the plugin is officially recommended to put"bottoms".
Script Type:What type of Google tracking code to install, different types of codes track different data and have different code volumes. It depends on how you use Google Analytics. I'm going with Minimal, the smallest code size (1.5KB) is the fastest, while tracking the least amount of data, but it's enough. Click to viewVarious types of tracking code differencesThe
IP anonymization:Open up, comply with privacy settings in some countries, we have to obey the law.
Tracks logged-in administrators:Close without tracking the data of your own page views.
Enable AMP Support:Shut down, AMP is dead in name only, no one uses it now.
Tool Setting
Click on "Tools" in the upper right corner to enter the tool settings.

Plugin Settings
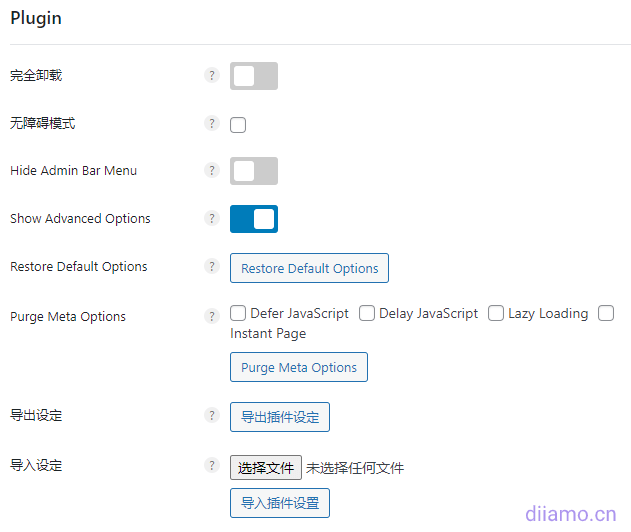
Completely uninstalled:Set whether to delete all data and settings of Perfmatters plugin after uninstalling it. If you decide not to use the plugin, turn this on before uninstalling.
Hide Admin Bar Menu:If you don't turn it on, the Perfmatters shortcut button will appear in the top bar of the backend. You can regenerate the key CSS (Remove Unused CSS) to enter the plugin settings interface. If "Remove Unused CSS" is enabled, it is recommended to leave it on by default.
Show Advanced Options:After enabling the delayed loading JS settings will be added to the bottom of the following ↓ 2 features, the specific role of the text to see the following explanation. If your site has encountered the following two problems on the enable this feature, if not encountered or you can not read the following two features recommended to keep disabled.

Turn it on if you encounter a click delay (Disable Click Delay)↓

If you encounter an invalid click in the IOS browser need to double-click to work, open it (Enable FastClick)↓

Purge Meta Options: Ignore, keep default, will not appear in the Meta Options box after checking the corresponding function. When editing a page, article or product, the following ↓Perfmatters Meta Options box will appear, you can disable asynchronous loading of JS, delayed loading of JS, delayed loading of images, and mouse-over of preloaded links on the current page, which is very useful.

The other functions are understood at a glance, without much explanation.
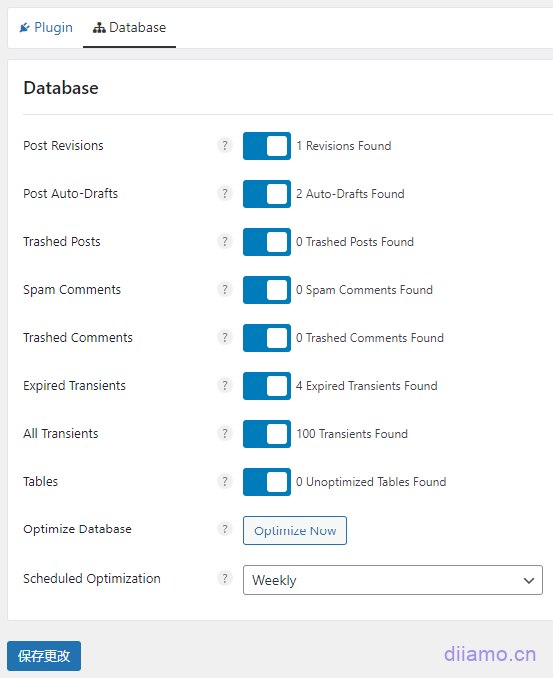
Database Settings
![]() This is the automatic database cleanup setting, and the automatic database optimization function of Little Rocket, just choose one of the two. According to the following picture, you can choose Weekly or Monthly to clean up the database automatically.
This is the automatic database cleanup setting, and the automatic database optimization function of Little Rocket, just choose one of the two. According to the following picture, you can choose Weekly or Monthly to clean up the database automatically.
Perfmatters Tutorial
Setting it up is just the entry level foundation for using this plugin well, using it well is the key to optimizing your website speed to the max.
Disabling useless resources with Perfmatters
First, enable the script manager in the Assets settings and tap Save. You can't close the script manager after disabling resources, otherwise the disabling will be disabled.

1- After you enable it, "Script Manager" will appear at the top of the background when you are editing an article, page or product, and you will enter the script management interface of the page you are editing when you click on it.![]()
2- You can also click on the "Script Manager" ↓ in the list of articles, products and pages to attract content.Script management interface.

3- or inforward part of sth.After the page URL, add/?perfmattersYou can also enter the resource management interface of the corresponding page by pressing the Enter key on the keyboard. For example, the home page address of this site is https://diiamo.cn, add the script manager suffix becomes https://diiamo.cn/?perfmatters. After visiting the site, you will enter the script manager interface shown in the figure below.
If you need to go to some page with a ? question mark URL suffixes, the script manager can be used to add&perfmattersFor example, to access the search results page Script Manager can be accessed at the URLs https://xxx.com/?s=&perfmatters and https://xxx.com改成你们搜索界面网址.

For ease of use, first go to"Settings"The interface is set up a bit.
Set the settings as shown below and tap Save. Then tap the top left corner "Script Manager"Back to the resource management interface.
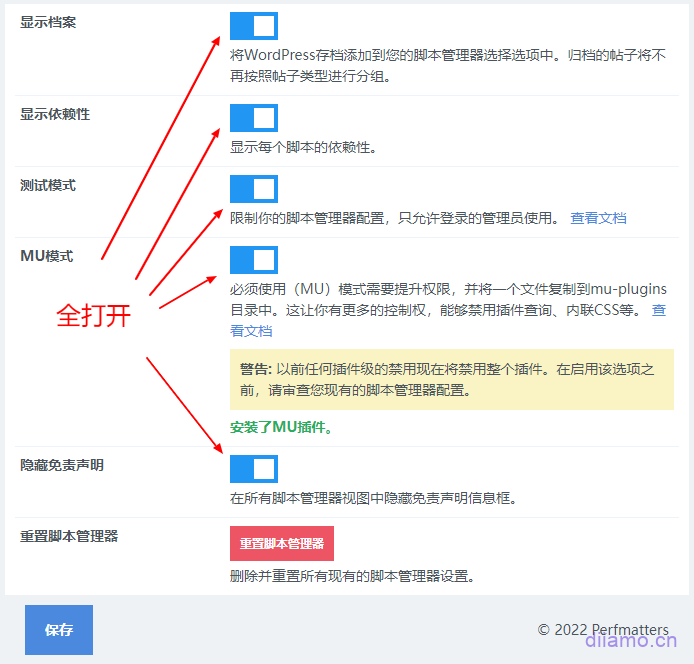
Note: After the third test mode is opened, only the administrator can see the effect of the page after disabling the resources, and visitors still visit the page without disabling the resources. After disabling the resources to test the site display and functionality of normal remember to come back to close the "test mode", clean up the cache, disable resources will come into effect.
(MU) mode Takes the Script Manager to a whole new level, providing more control andDisable WordPress plugin queriescouplingas well asInline CSS and JSThe ability to click through to theMU mode detailed explanation and use tutorial. This feature is not recommended for newbies.
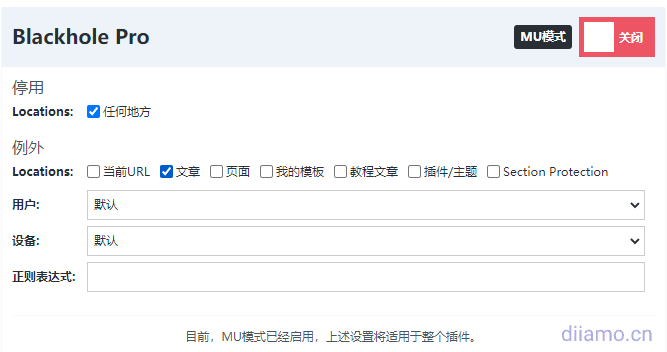
Here is a tutorial on disabling scripts, first understand the meaning of the "Locations" option in the picture below.

1: Article detail page;
2: General page, also known as the backend "page" ![]() Page inside the section;
Page inside the section;
3: Product detail page;
4: Article listing page;
5: Article tab;
6: Author page (very few sites will use this kind of page, can be ignored);
7: Product category page;
8: Product tab;
9: Product archive page, product list page by date, basically can not be used, ignore;
Here is a tutorial on how to use Perfmatters Script Manager ↓.
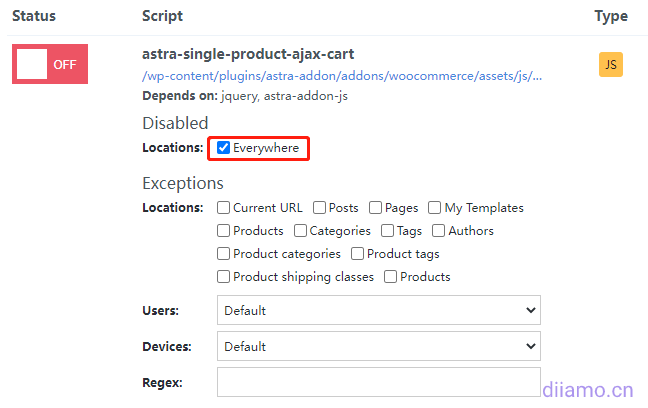
1- If it is to be inpossessTo disable resources on the front-end page, check "Everywhere" directly as shown below.
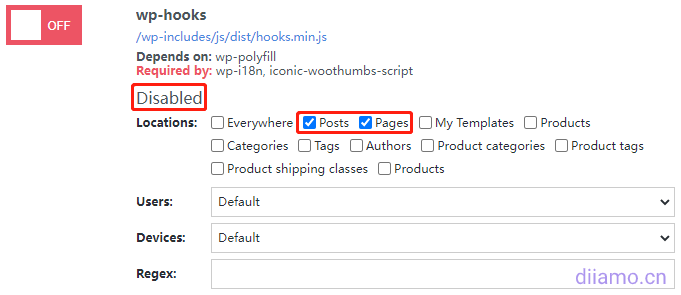
2- If you need to disable the resource only on certain types of pages, just check the page types that need to disable the resource under Disabled. For example, the following picture means that the JS "wp-hook" will be disabled only on the article details page and the general type of pages.
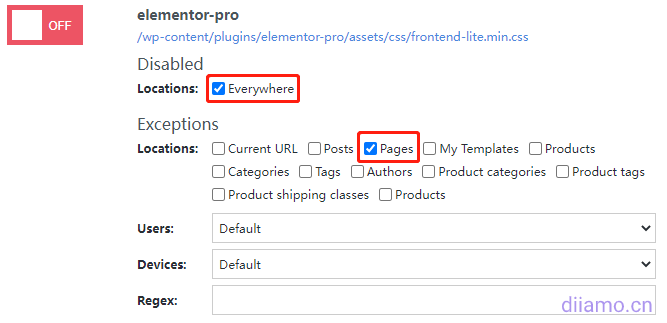
3- If you need to load the resource only on certain types of pages, first check "Everywhere" global disable, and then under Exceptions, check which pages you need to load the resource (exclude disabling the resource on the checked pages).
For example, the "elementor-pro" CSS in the image below is only loaded on pages of type "pages", and is disabled on all other types of pages (article/product listings/detail pages, search pages, shopping cart pages, etc.).
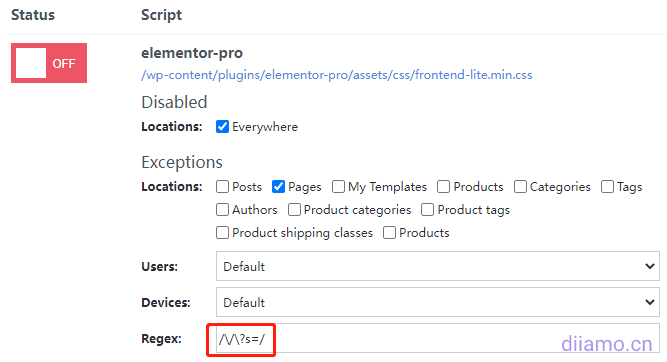
If the Options below Exceptions option does not have a page option that you would like to exclude from being disabled, such as a search results page, you can use Regex. Or if you feel that using the Exceptions option is not precise enough, you can use Regex, which can be used in conjunction with the Exceptions option, and both will take effect.
For example, the following Regex input/\/\?s=/indicatesurname YeLoad this resource on the search results page. Learn aboutRegex usage and writingThe
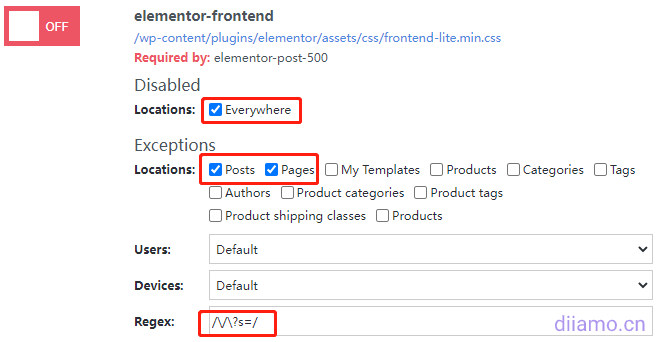
Note: Search results pages created with elementor require the use of Archive Posts. ![]() Widgets that use the "elementor-fronted" CSS resource shown below. If you set this resource to load only in Posts and Pages like we did (below), you will need to enter the following into your Regex/\/\?s=/Let itsurname YeLoad the search results page made in elementor.
Widgets that use the "elementor-fronted" CSS resource shown below. If you set this resource to load only in Posts and Pages like we did (below), you will need to enter the following into your Regex/\/\?s=/Let itsurname YeLoad the search results page made in elementor.
This is the end of the Perfmatters setup tutorial, if you have any questions, please feel free to comment.
Advanced Advanced Optimization Tutorial (paid)
If you follow the above tutorials to optimize in place, the site speed should increase a lot, there may still be some places that have not been optimized in place, theGoogle speed testThe mobile score never went up. The tool is dead, the website as well as the idea is alive, depending on your ownStatus of the websiteTargeted optimization gives the best results. The depth of understanding of plugin use and optimization will also affect the results.
The following paid content contains high-level optimization ideas, optimization techniques, and plugin advanced usage, which can take your website speed optimization results to the next level, as well as enhance your WordPress speed optimization skills.
Note: each site is not the same, some sites out of the root cause of the problem basically can not be optimized. For example, the server is too poor to respond to high latency, install too many bulky plug-ins front-end loading too much code. Have to first solve the problem from the root cause.
After the purchase to enjoy WeChat artificial 1 to 1 consulting services ↓, you can enjoy artificial help you analyze the website problems and give optimization suggestions / ideas. If you have any other speed-related questions, you can also leave a message/consult customer service.


High-order optimization tutorials require a little bit of foundation, rookie novice if you do not understand do not buy tutorials! Do not understand or operate after the effect is not good we are not responsible. We only help review the site to provide optimization advice, you need to rely on your own operation optimization.
Limited Time Benefits:Buy this Advanced Advanced Optimization Tutorial and get one year free!ShortPixel Image Compression Plugin. You can compress images without limitation, do not limit the number of sites, support the generation of WebP and Avif format images, greatly improve the speed of the site.
After purchasing this tutorial, take a screenshot of the purchased resources in your personal center to WeChat customer service (QR code in the footer) to get the plugin API activation code.

This content view is priced at $99 (20% VIP discount, free lifetime VIP), please firstlog inView/download the appropriate paid content after purchase
Check optimization results
Follow the above method to optimize and go to GoogleClick to go to the Google speed test pageTest. Under normal circumstances the computer score should be 95-100 with a page load time of 1 second. Mobile score should be 90-100 with page load time of 1.5-2.5 seconds.
If the score doesn't meet the above criteria, it's likely that the steps weren't done correctly, so go over them againThe Ultimate WordPress Speed Optimization Tutorial.It is also possible that the web server, web theme, etc. is not working and affecting the speed. It's also possible that the web server, web theme, etc. are not working to affect the speed.
Optimized with Perfmatters but slowed down instead?
Some users feedback after using this plug-in optimization speed is not as fast as when using Wp Rocket, Wp fastest cache and other plug-ins. PM is a resource optimization plug-ins, does not have a cache function. PM is a resource optimization plugin that does not have a cache function.The caching features of plugins such as Wp Rocket, Wp fastest cache, etc. can greatly improve the speed of your website.
please includePM works with the cache plugin! Disable all the features in the cache plugin that are the same as PM and only enable the same features in PM. Any simple caching plugin can work great with PM, we recommend the free WordPress officialWp Super CacheOr free downloads from our websiteWp Fastest Cache PremiumCache plugin.
It is also possible that the delayed loading JS function has delayed the loading of some important JS leading to an increase in rendering time, turn off the delayed loading JS function to clean up the cache to see. If this is really the case, just exclude the corresponding JS being delayed loading.
There is also the possibility that the CDN cache is not yet complete, the browser privacy mode to open the foreground refresh a few times, and so on after a few minutes and then test the speed to see.

