
Latest Fluent Forms Pro download, GPL license, free Fluent Form Signature form signature feature extension plugin.Fluent FormsIt is the fastest and most powerful form plugin for WordPress.
Can be used to build inquiry system, message system, questionnaire survey, user subscription form and other complex, difficult form. The famous Perfmatters plugin company website also uses Fluent Forms to build a message system.
Click to viewWPForms vs Fluent FormsClick to viewGravity Forms vs Fluent FormsThe
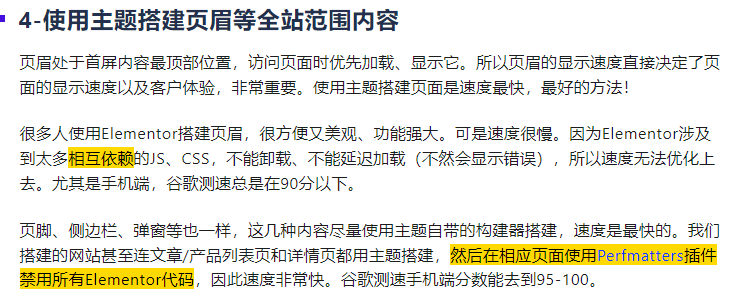
We are inThe Ultimate WordPress Speed Optimization Tutorial.It is mentioned that if you want to optimize the page load speed you should use theAstra ProAnd so on quick theme to build header, footer, make product/article list page, detail page, don't use Elementor to build them. And usePerfmatters pluginDisable all Elementor code to increase speed.
So the inquiry system for product/post detail page, list page should not be made with Elementor form widget, Fluent Forms Pro is a perfect form inquiry plugin. It's fast, full-featured yet powerful and highly customizable.
Fluent forms can be used to create a calculator by clicking on theView Details. Click to view allFluent Forms Forms Demo Template(You can download and import it directly).

Benefits of Fluent Forms Pro
Why choose Fluent Forms Pro? Because it's the fastest, most versatile, highly customizable, and effective at blocking spam!
Fast:We have compared includingWP FormsAmong several well-known form plugins, Fluent Forms is the fastest. It only loads the following 4 resources on the front-end, totaling 47.3KB, and pages that do not contain Fluent Forms forms do not load resources.
The red box CSS below can be disabled if the form is inserted through a shortcode form, and is only required if the Fluent Forms form is inserted through an Elementor widget.
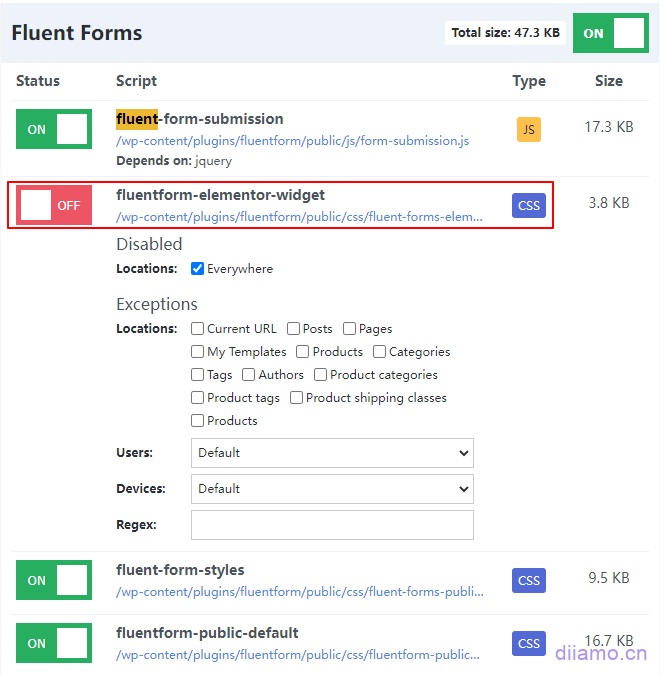
In comparison WP Forms forms load 100+ KB of resources on the front-end; Ninja Forms loads 200+ KB; Contact Form7 loads form code on all pages.
Form Storage + Reminders:Fluent Forms comes with form storage, and the top bar and dashboard widgets prompt for numbers when there is a new form. Contact Form7 and the like do not have form storage, require the installation of an additional DB plugin, and have a less user-friendly interface.
![]()

Powerful:Fluent Forms has many types of form templates and functions , you can do collections , dialog , subscription , surveys , signature functions and so on. Convenient to expand the functionality of the site later . The setup is also simple and recommended. Here are a few uses/special features:
- Show download file button/link/text after successful form submission;
- Automatically verify whether the mailbox is real and valid, no need to send CAPTCHA verification;
- You can set the form to take effect only on certain dates and time periods;
- Allows you to set the field input to allow/reject the form submission if it meets the preset conditions;
- Conditional logic can be used by clicking theView Details.;
- Setting FieldsDynamic defaults.;
Spam protection:Fluent Forms honeypot is more powerful than similar plug-ins, and also has an exclusive blacklist keyword blocking feature that allows you to individually set which keywords are prohibited for each input field, greatly improving the success rate of blocking spam.
![]()
High degree of customization:The form itself can be customized to a very high degree , the official has a super hook (hook) can be adjusted to the depth of the form appearance and functionality . Official documentation is also very detailed, I have not seen other form plugin has such rich documentation.
What is GPL Plugin
This plugin is a GPL licensed product and is safe and legal. Click to learn whatGPL licenseClick to learnWordPress official website about the GPL. Simply put the plugin/theme source code open source sharing using the GPL agreement can be legally and freely changed, used, and distributed.
The company that owns the plugin/theme mentioned in the title of this item is not affiliated with us in any way, and the company has not licensed its products or brands to us. This product is a distribution of the plugin/theme mentioned in the title, created by a third party company/developer and redistributed by us under the terms of the General Public License (GPL).
We use the plugin/theme name for the sole purpose of identifying the plugin/theme on which this GPL merchandise is based, with the intention of helping users better understand the functionality and possible application scenarios of this product of ours, and in no way to impersonate or mislead. This merchandise is sold under and respects the terms of the GPL license agreement and ensures that users are aware that they are acquiring a distribution of the plugin/theme based on an open source license. They are allowed to view, modify and redistribute the software to promote its free use and development.
Plug-in Security
Purchased directly from foreign formal channels, do not modify the source code. All plug-ins we use to build their own sites, used in a number of sites, safe, stable and reliable.Worried about plugins being insecure? Check out theIs WordPress Cracked Plugins/Themes (Green, GPL, Nulled) Safe?The
- pass (a bill or inspection etc)Virustotal Antivirus Verification.;
- pass (a bill or inspection etc)WordfenceSource code review;
- pass (a bill or inspection etc)SucuriSecurity antivirus scanning.
Updated methodology/records
General new version out within 24 hours of this site will be updated, then please visit this page directly to download the new version of the installation package to upload updates, the product title will be written on the latest version number. Can only be updated by uploading the installation package, mind do not shoot, if you want to update online can only go to the plug-in official website to buy the original version.
Click to view the update log of this plugin (Changelog)
Fluent Forms Pro Download Terms of Purchase
This site plug-in purchased from foreign sites, the purchase price is$4.99/eachThe validity period is 2 years. Foreign trade star uniform selling price of 19 yuan / a, valid for life, and spend a great deal of effort to produce the use of tutorials also provide manual Q&A service, absolutely value for money.
Plug-ins are for study and research only, virtual products are reproducible and non-refundable once sold, for more information, please go toterms of serviceThe
Foreign trade star for the purchase of users to provide after-sales service, plug-in use of the process of any questions please leave a message in the comments below, there are questions and answers.
Installation/Enabling Methods
Install the base version firstClickDownload the basic versionThen install the premium version (the zip installer that you purchased and downloaded from this site).
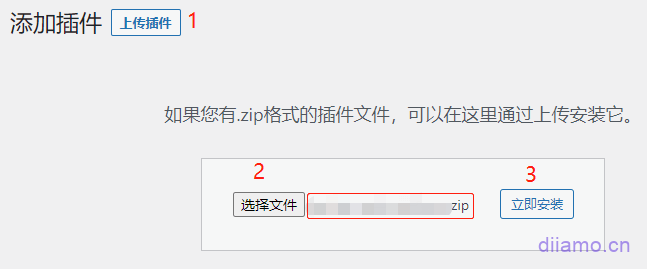
Installation method 1: Upload and install
Find and click "Plugin">"Install Plugin" in the left menu column of the website background, then click "Upload Plugin" in the upper left corner, upload the downloaded zip installation package and click "Install Now", after installation, click on the"Enable plug-ins"Complete the installation.
Installation method 2:FTP installation
Unzip the plugin zip and place the unzipped obtainedfile (paper)Upload to the plugins directory (xxx.com/wp-content/plugins).
Find and click "Plug-ins" > "Installed Plug-ins" in the left menu column of the website background, find the plug-in in the plug-in list, and click "Enable".

Fluent Forms Setup Tutorial
Powerful also means more settings, Fluent Forms settings are very simple to understand, do not understand if you look at the official documentation or comments below. Click to view moreFluent Forms TutorialThe
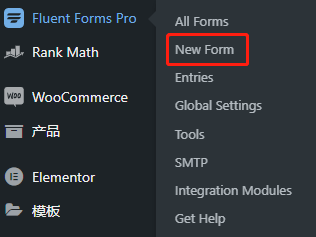
Creating a new form
New forms can be created by importing fluent forms from other sites, see below for detailsExport Import FormChapter. Follow the tutorial below to build a new form from scratch.
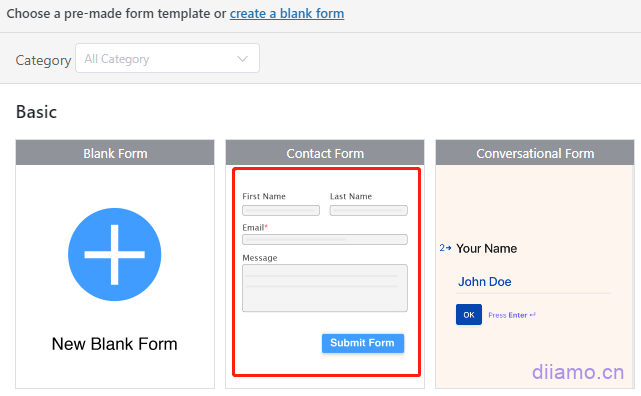
Click "New Form" to create a new form.
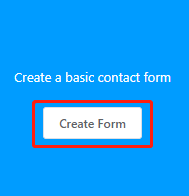
You will first enter the following form template interface, select the template you want and click "Create Form" to create the form. Build inquiry, message form generally choose "Contact Form" template. Fluent Forms has a lot of very powerful templates, interested in their own view.
Go to the form details page below and set up the form yourself as instructed in the image below.
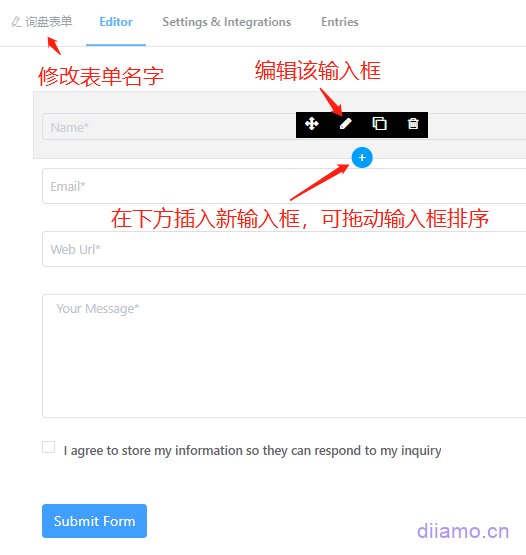
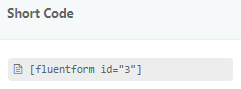
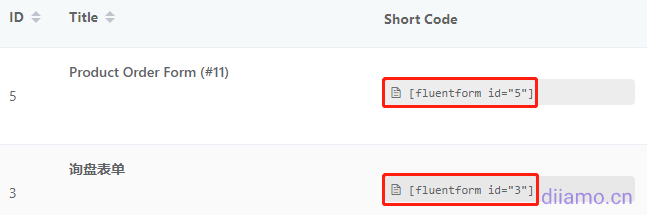
Tap "Save Form" in the upper right corner to finish creating the form. The blue box is the short code of the form, by inserting the short code into the page you can insert the corresponding form.
![]()
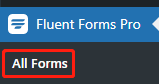
Or click "All Forms" to enter the list of forms, you can also view the form short code.

How do I insert a form into a page?
1- Insert using the Elementor widget:
Fluent Forms has an Elemenotr widget that allows you to insert ff forms and set styles directly in the Elemenotr editor, which is very convenient.
After inserting the widget first select the form created in the backend to insert.
Then you can change the appearance of the form in the "Style", very convenient.
2- Use short code insertion:
Click "All Forms" to enter the form list page.
Click on the code in the red box below to copy the code and paste it into the editor, or use it in the Elementor shortcode widget.
Setting up a popup form for button clicks
Fluent Forms can also do click button popup forms. Just put the following short code into the page and a button will appear ![]() , clicking on the button will bring up the corresponding form.
, clicking on the button will bring up the corresponding form.
Change the number 3 to the number of the form ID you want to pop-up;Enquiry NowIt's button text, change it to what you want;flientfpbis the .class name of the form, by defining this class you can control the size of the button, background color, spacing, etc., which can be customized and modified.
We at Foreign Trade Star have submitted a suggestion to the officials to add a popup button Elementor widget. This eliminates the need to use code and allows you to customize the style of the button, and the official response took our suggestion on board.
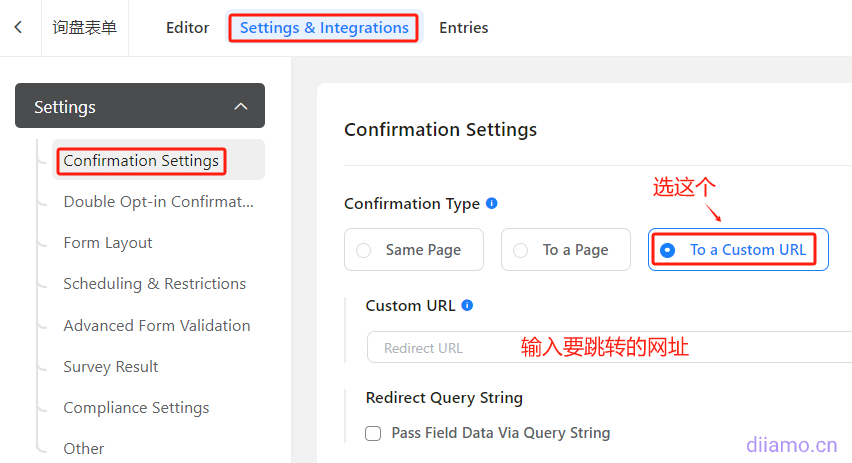
Redirect to other (Thank You) pages after submitting a form
You need to set the form to jump to Thank You page after successful submission. Enter the form settings page, according to the following figure to set up on the line. Under normal circumstances after clicking submit form 1-3 seconds to adjust the normal speed, more than 4 seconds to jump may server or link mailbox speed is a little slow, need to optimize.
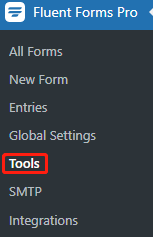
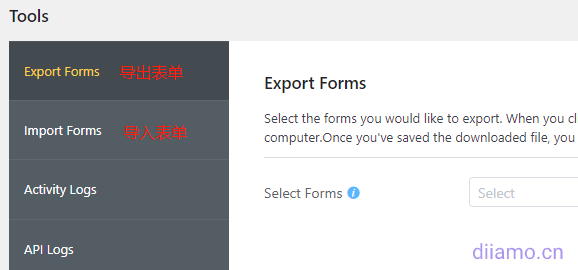
How to export the import form?
Go to the "Tools"↓ option.
Below is the export-import function, which is very simple to operate.
View form content
After installing the plugin, a Fluent Forms new form alert box will appear in the dashboard, and the red box below will be updated with numbers when an inquiry comes in. The first number indicates unread inquiries, the second number indicates the total number of inquiries, click on the number to go to the inquiry list page.
Clicking on "Entries" will also take you to the inquiry list page.

Click on the eye on the far right of the inquiry to view the inquiry details, and click on the trash can icon button to delete the inquiry.

Spam blocking settings
First, create a new input box in the form, and select Website URL as the type.![]() In the input box "Advanced Options" setting > "Container Class", fill in "". In the input box "Advanced Options" setting > "Container Class", fill in "weburl".
In the input box "Advanced Options" setting > "Container Class", fill in "". In the input box "Advanced Options" setting > "Container Class", fill in "weburl".
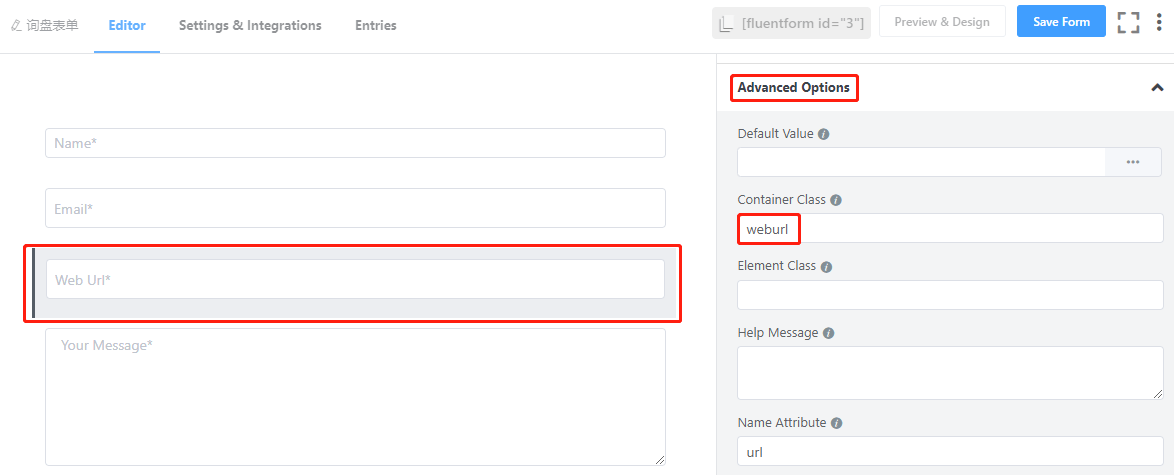
Paste the following CSS directly into "Settings&Integrations">"Custom CSS/JS" as shown in the figure below and click Save. This CSS code will hide the Website URL input box.
.ff-el-group.ff-el-form-hide_label.weburl { display: none!important;}
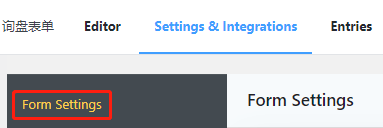
Then in the "Settings&Integrations" settings of the created form, find "Form Settings" > "Advanced Form Validation".
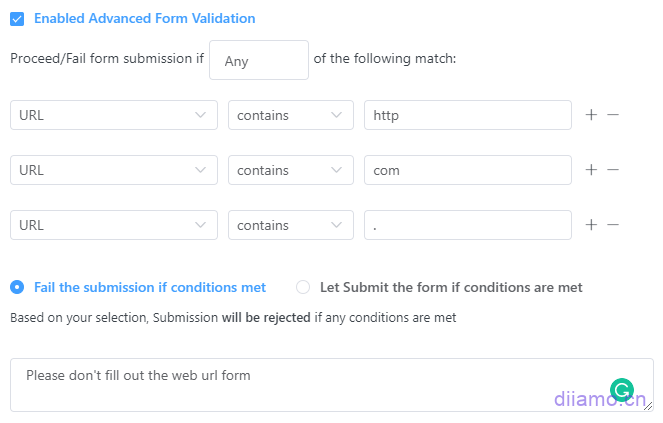
Set it as shown below. The meaning of this setting is that as long as the robot fills in the URL input box, it will be blocked. Because the URL input box is hidden by the CSS we added above, only the robot can find the URL input box and the input content will be blocked.
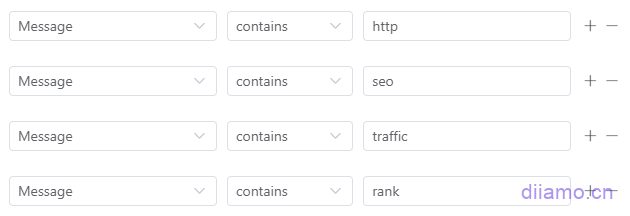
It is also possible to set up a Message infobox keyword blacklist. If you receive marketing emails, add the unique keywords in the email as shown below to block them. Commonly used marketing keywords are Seo, Rank, traffic, http (insert url in the message content) and so on.
Don't set the blocking rules too strictly for fear of hurting normal visitors by mistake. Be sure to test whether you can successfully leave a message with your browser's privacy mode after setting it.
You can also set up a blacklist of keywords to be blocked by mailbox input. There's a lot to play with, use your imagination.

Enable honeypot, CAPTCHA function
Honeypot and CAPTCHA features can effectively block bots and stop spam forms, and are recommended to be turned on.
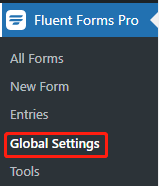
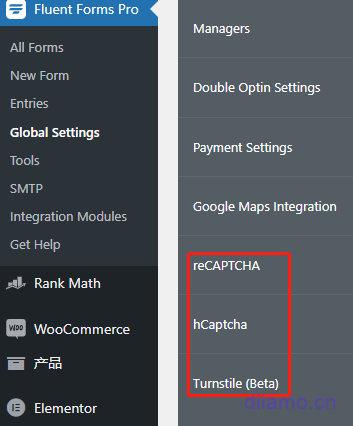
Go to "Global Settings" ↓.
Find it in Settings.![]() .. A honeypot is a hidden input box that is visible only to bots. Once a bot enters content into this hidden box, it will be intercepted.
.. A honeypot is a hidden input box that is visible only to bots. Once a bot enters content into this hidden box, it will be intercepted.
Note: Turnstile, reCaptcha and other CAPTCHA may not work on domestic websites. There are 3 kinds of CAPTCHA settings in "Global Settings", you can turn them on as needed. We don't recommend using any Captcha as it will degrade the customer experience and affect the page loading speed.
If you must use a CAPTCHA, it is recommended to use theTurnstile, fast and effective.
Verify that the email address entered is real and valid
In the form construction page, email input box settings can choose the validation format, if you enter a non-email format content will prompt the address error. A customer said he would like to add a function to verify whether the email is real or valid, we think it's quite meaningful. To validate the mailbox, you need to use an external service, here are the 2 methods we found in Google, enable them as needed.
Fluent Forms + Clearout Integration, requires registration + installation of a plugin.
Email Verification with Emailable, you need to register + install a piece of code to functions.php
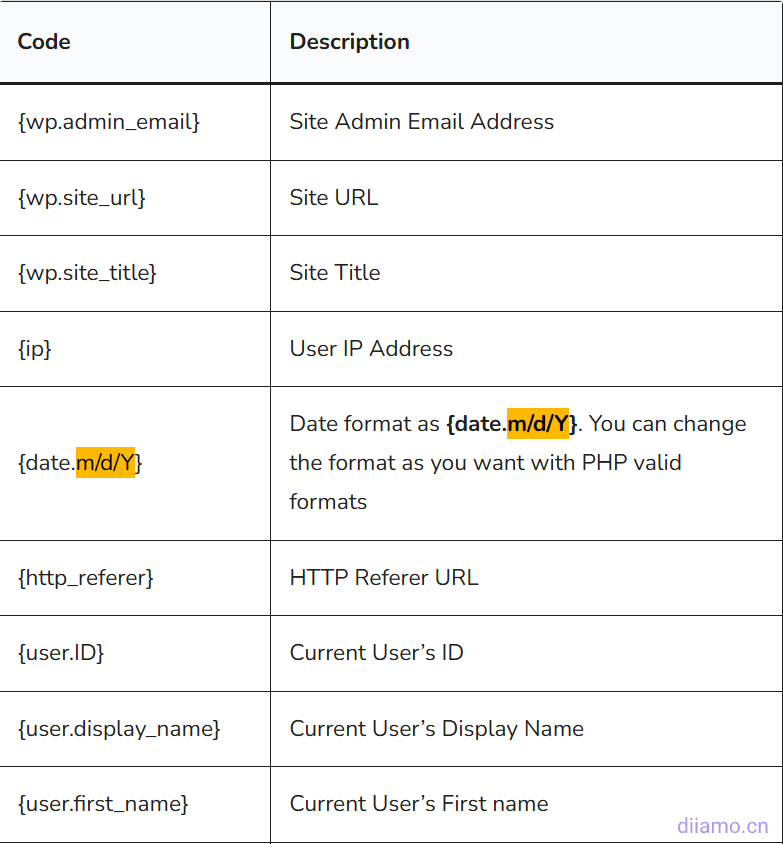
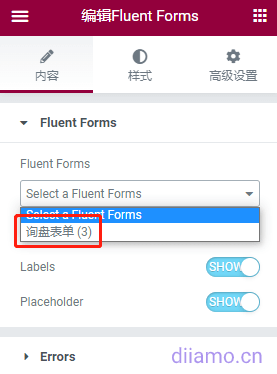
How do I automatically get to display the contents of an ACF field?
ACF fields are very commonly used, especially for customized product detail pages, and detail page forms sometimes need to automatically retrieve the content of the corresponding ACF fields. Just fill in the default content of the form with the shortcode {embed_post.acf.ACF_KEY} The corresponding content can be retrieved and displayed.ACF_KEY It needs to be changed to the name of the corresponding ACF field.
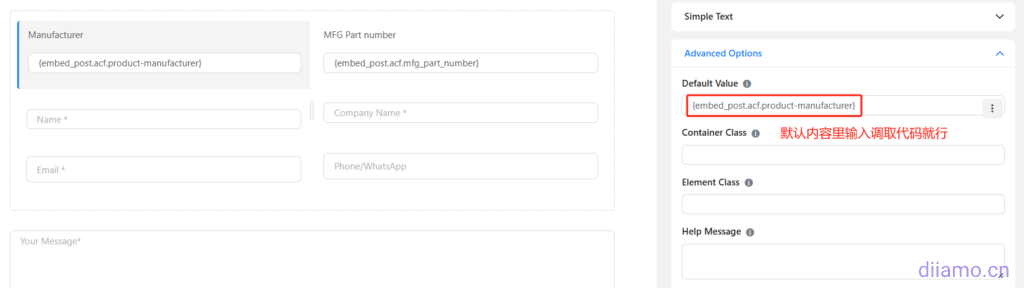
The location of the name of the ACF field is shown below.

In addition to pulling up ACF fields, there are many other things that can be pulled up through the shortcode (the image below is only a portion of the content), which is very powerful! Click to viewDetails of how to use the short code and what to retrieveThe